
Hosting a winter outdoor party Peachtree Corners ga requires thoughtful preparation to keep guests comfortable when temperatures drop. From selecting the right layout to arranging heating elements, every detail contributes to a pleasant experience. This guide walks you through the essential steps, focusing on guest‑count math, yard preparation, heating options, a realistic timeline, rain‑ready plans, and the logistics of getting everything to your location. By following these suggestions, you can create a memorable celebration that embraces the season while ensuring everyone stays warm and entertained.
Understanding the Climate Challenges of a Winter Outdoor Party Peachtree Corners ga
Peachtree Corners experiences cool to cold weather during the winter months, with daytime highs often hovering in the 40s and nighttime lows dipping into the 20s or lower. Wind chill can make it feel even colder, especially in open yards that lack natural windbreaks. Recognizing these conditions early allows you to plan appropriate layers of warmth, such as heated blankets, patio heaters, and sheltered seating areas, so guests remain comfortable throughout the event.
Beyond temperature, consider humidity and precipitation possibilities. Even on clear days, moisture from the ground can rise and make seating damp if not properly insulated. Planning for a dry surface, using ground covers or flooring options, and positioning seating away from low‑lying areas helps prevent discomfort. By addressing both temperature and ground conditions, you create a foundation that supports all other warming strategies.
Assessing Wind Exposure and Natural Windbreaks
Take a walk around your property at different times of day to note where gusts are strongest. Identify existing features like fences, shrub lines, or the house itself that can act as windbreaks. If natural barriers are insufficient, plan to add temporary screens or position the tent so its narrow side faces the prevailing wind. This simple step can significantly reduce the wind chill factor experienced by guests.
Consider using portable windbreak panels made of fabric or bamboo that can be anchored alongside the tent. These panels are easy to set up and take down, and they provide an extra layer of protection without blocking views. Properly placed windbreaks also help keep heating equipment more efficient by reducing the amount of warm air that gets blown away.
Guest‑Count Math and Seating Arrangements
Start by determining the exact number of attendees you expect. This figure drives decisions about tent size, table layout, and the quantity of heating devices needed. For example, a 20 × 20‑foot tent comfortably accommodates 32 to 40 seated guests, while a 30 × 60‑foot structure can hold 120 to 150 seated guests. Knowing your guest count lets you select a tent that provides enough interior space for both seating and warming equipment without overcrowding.
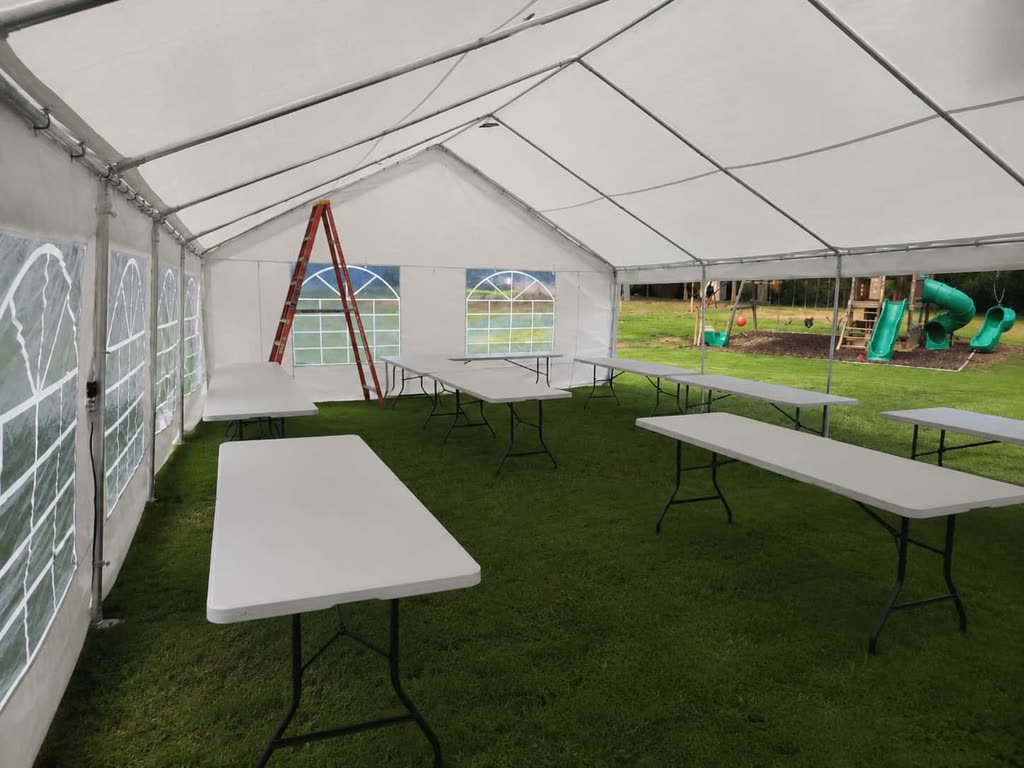
Once the tent size is set, arrange tables and chairs to promote circulation and efficient heat distribution. Rectangular tables placed along the perimeter leave the center open for a heat source, such as a freestanding patio heater or a portable fire pit, allowing warmth to radiate outward. Ensure aisles are at least three feet wide so guests can move easily, and consider adding lounge furniture or ottomans for additional seating options that still benefit from ambient heat.
Calculating Table and Chair Quantities
Determine the mix of seating styles you want—formal banquet tables, cocktail tables, or lounge seating—and apply the appropriate guest‑per‑unit ratios. For rectangular tables, plan on 6‑8 guests per 6‑foot table and 8‑10 guests per an 8‑foot table; for round tables, use 10 guests per 6‑foot round and up to 12 only in approved layouts. This calculation ensures you rent enough furniture without excess.
Factor in extra chairs for unexpected guests or for vendors who may need a seat during setup. A common practice is to add 10‑15 % more chairs than the seated guest count. Document these numbers in your rental request so the delivery team brings the correct quantity on schedule.
Yard Preparation and Ground Protection
Before any equipment arrives, inspect the yard for obstacles such as low branches, uneven ground, or soft spots that could become muddy if precipitation occurs. Clear the area of debris and mark the exact footprint where the tent will sit. Using ground protection panels or interlocking flooring tiles beneath the tent prevents damage to grass and provides a stable, level surface for tables, chairs, and heating units.
If the ground is particularly soft, consider laying a base of gravel or sand under the protective flooring to improve drainage and stability. This preparation also helps keep the interior of the tent dry, which is essential for maintaining warmth. A dry floor reduces the risk of cold radiating up from the ground, contributing to a more comfortable environment for guests.
Soil Assessment and Anchoring Methods
Perform a simple soil probe by inserting a metal rod or screwdriver into the ground at several points within the tent footprint. If the rod penetrates easily, the soil is soft and may require deeper anchoring or additional weight bags. For firmer soil, standard stakes or auger anchors usually provide sufficient hold.
Choose anchoring equipment based on surface type: sandbags or water weights work well on grass or gravel, while ground spikes or augers are suited for harder ground. Always follow the manufacturer’s recommendations for the number and placement of anchors relative to tent size and expected wind loads.
Heating Solutions and Ambiance
Select heating equipment that matches the size of your tent and the expected guest count. Freestanding propane patio heaters are effective for medium‑sized gatherings, while larger events may benefit from multiple units strategically placed around the perimeter. Always follow manufacturer guidelines for clearance from combustible materials and ensure adequate ventilation if using any open‑flame devices.
Enhance the warming effect with accessories such as insulated tablecloths, heated seat cushions, and warm beverage stations offering hot chocolate, tea, or coffee. Soft lighting, such as LED string lights or lanterns, adds visual warmth without raising temperature, creating a cozy atmosphere that complements the physical heat sources. Combining functional heating with thoughtful décor results in a space that feels inviting and comfortably warm.
Timeline and Day‑of Schedule
Begin preparations the day before by confirming delivery windows, verifying that all rented items have arrived, and performing a quick site check. On the day of the event, aim to have the tent erected and grounded at least two hours before guests are expected to arrive. This lead time allows you to position heating devices, test their operation, and make any necessary adjustments to table layouts or flooring.
As guests start to arrive, welcome them with a warm drink station and direct them to the heated seating areas. Keep a schedule for activities such as meals, speeches, or entertainment, ensuring there are breaks where guests can move around to stay warm. After the event, allocate time for safe breakdown of heating equipment, tent takedown, and ground restoration, leaving the yard in the same condition you found it.
Load‑In Timeline Breakdown
Start the day with a crew briefing that outlines each person’s role and the expected arrival times for each rental item. Allocate the first 30 minutes to unloading and positioning the tent components near the marked footprint. The next hour should be dedicated to raising the tent, securing anchors, and laying ground protection.
After the tent is stable, spend the following 45 minutes installing sidewalls, positioning heating units, and arranging tables and chairs according to the layout plan. Reserve the final 30 minutes before guest arrival for a walk‑through to verify heating operation, lighting, and that all pathways are clear.
Rain Plan and Weather Contingencies
Even with a solid forecast, winter weather can change rapidly. Prepare a rain plan that includes sidewalls for the tent, which can be quickly attached to shield the interior from wind and precipitation. If sidewalls are not sufficient, consider having a secondary, smaller tent or a portable canopy ready to cover critical areas such as the food service or gift table.
Monitor the forecast throughout the day and establish a clear decision point—for example, if sustained winds exceed a certain speed or if heavy rain is predicted, be ready to move the event indoors or to a covered area. Communicate this plan to any vendors or helpers in advance so everyone knows the steps to take if conditions deteriorate.
Emergency Shelter and Sidewall Options
Keep a set of removable sidewall panels on hand that can be zipped or velcroed onto the tent frame within minutes. These panels are typically made of reinforced polyester and provide both wind resistance and water repellency. If wind speeds are forecast to exceed 15 mph, plan to deploy the sidewalls early.
For added protection, consider a pop‑up canopy with sidewalls that can be placed over the food table or gift area. This secondary shelter ensures that food stays dry and that any electronic equipment, such as a sound system, remains operational even if the main tent suffers a brief leak.
Drive Logistics and Vendor Coordination
Calculate the travel time from our Pendergrass warehouse to your Peachtree Corners location, factoring in typical traffic patterns for the day of your event. Aim to schedule deliveries early enough to allow for unloading, setup, and any unforeseen delays, while still leaving ample buffer before guest arrival. Providing the exact street address, including ZIP code, ensures the driver can navigate efficiently and avoid unnecessary detours.
Confirm with each vendor—whether providing tables, chairs, heating units, or décor—their arrival windows and any site‑specific requirements, such as access for large trucks or need for a flat surface. Share a simple site sketch that marks the tent location, heating zones, and pathways. Clear communication and precise timing help everything run smoothly, letting you focus on enjoying the celebration with your guests.
Local Traffic and Permit Considerations
Check with the City of Peachtree Corners for any temporary street‑use or parking permits that might be required for large delivery trucks. While most residential deliveries do not need a permit, events that block a driveway or sidewalk for an extended period may need approval. Submit the request at least three business days before the event date.
Plan the delivery route to avoid peak‑hour congestion on major arteries such as Peachtree Parkway and Medlock Bridge Road. Providing the driver with a pre‑planned route that includes alternate streets helps minimize delays caused by accidents or roadwork. Communicate any low‑clearance obstacles, such as overhanging trees, to the driver in advance.
Checklist for a Successful Winter Outdoor Party
Use this list to verify that every essential item is ready before guests arrive.
- Confirm guest count and finalize tent size.
- Verify delivery date, time, and exact address with ZIP code.
- Inspect yard, clear debris, and lay ground protection.
- Set up tent, secure anchoring, and install sidewalls if needed.
- Place heating equipment per manufacturer clearance guidelines.
- Arrange tables, chairs, linens, and ensure aisles ≥3 ft.
- Prepare warm beverage station and insulated tablecloths.
- Test lighting, LED strings, and any ambient décor.
- Have rain plan ready: extra sidewalls, secondary tent, or canopy.
- Communicate timeline and decision points to vendors and helpers.
- Plan breakdown: safe equipment shutdown, tent takedown, site restoration.
Final Day‑Of Walkthrough Verification
Perform a final inspection 15 minutes before guest arrival to confirm that all heating units are lit and functioning, that lights are on, and that pathways remain unobstructed. Check that sidewalls are securely attached if weather calls for them and that any backup canopy is staged nearby. Verify that the waste and recycling bins are placed conveniently and that the exit routes are clear for a smooth flow of guests.
Assign a point person to monitor the weather radio or app throughout the event and to trigger the rain plan if conditions change. Keep a fully charged phone and a list of vendor contacts on hand for any last‑minute adjustments. After the event, repeat the walkthrough to ensure the site is left clean and that all rental items are accounted for before the pickup crew arrives.
Frequently asked questions
How do I determine the right tent size for my guest count?
Estimate your seated guests, then match that number to the tent capacities: a 20 × 20‑foot tent holds 32‑40 seated guests, while a 30 × 60‑foot tent accommodates 120‑150 seated guests. Choose a size that leaves room for heating equipment and comfortable walkways.
What ground preparations are needed before the tent arrives?
Clear debris, level the area, and lay ground protection panels or interlocking flooring to prevent grass damage and provide a stable surface. If the ground is soft, add a gravel or sand base under the flooring for better drainage and stability.
Which heating options work best for a medium‑sized winter gathering?
Freestanding propane patio heaters are effective for medium groups; place them around the perimeter for even heat distribution. Always follow clearance guidelines and ensure proper ventilation if using open‑flame devices.
How far in advance should the tent be set up on the event day?
Erect and ground the tent at least two hours before guests arrive. This lead time lets you position heaters, test operation, adjust table layouts, and make any last‑minute tweaks before welcoming attendees.
What should be included in a rain plan for a winter outdoor party?
Include tent sidewalls to block wind and precipitation, and have a backup smaller tent or canopy ready for food or gift areas. Monitor conditions and establish a clear decision point for moving the event if weather worsens.
How do I coordinate deliveries from the warehouse to Peachtree Corners?
Provide the exact street address and ZIP code, calculate travel time allowing for traffic, and schedule deliveries early enough for setup with a buffer before guest arrival. Share a simple site sketch with vendors to clarify access and layout.