
Sandy Springs
Guest‑Count Math
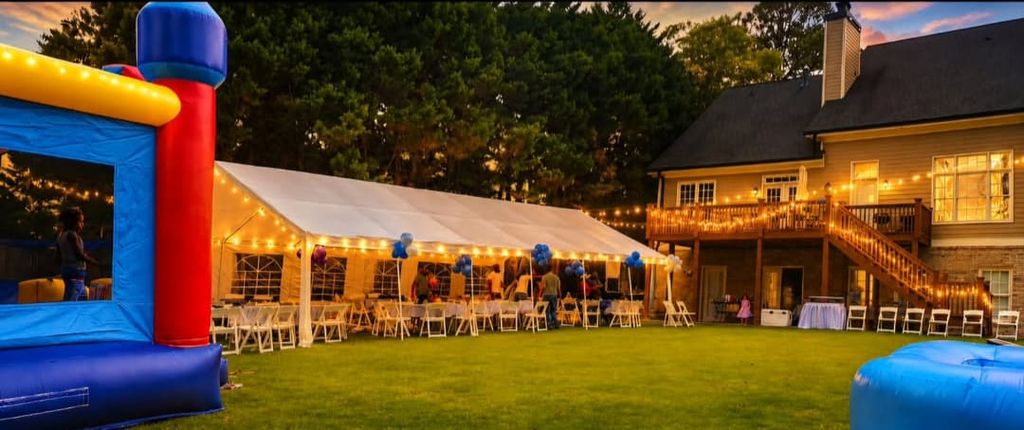
Understanding how many people your space can comfortably host is the first step in planning a successful outdoor celebration. Start by measuring the usable area of your yard, patio, or lawn. Subtract any permanent structures such as sheds, pools, or large trees that cannot be moved. The remaining square footage will determine the size of tent you need and how many guests can be seated or standing.
For seated arrangements, a common rule of thumb is to allocate about ten square feet per person when using standard banquet‑style tables and chairs. This allows room for the table, chairs, and a small aisle for service staff. If you prefer a cocktail‑style layout with high tables and standing guests, you can reduce the allocation to roughly six square feet per person because there is no need for chair space.
When planning a mix of seated and standing areas, calculate the seated portion first using the ten‑square‑foot guideline, then add the standing portion using the six‑square‑foot guideline. Add the two results together to get the total square footage required. Compare that number to the usable area you measured earlier; if the required footage exceeds what you have, consider either reducing the guest list or selecting a larger tent size.
Keep in mind that additional elements such as a dance floor, buffet tables, or a lounge area will increase the space needed per guest. Allocate extra square footage for each of these features based on their typical dimensions. For example, a modest dance floor for up to fifty guests usually requires about twenty‑five square feet per dancer, while a buffet line may need an additional five square feet per guest for serving stations and traffic flow.
Finally, always leave a buffer of at least ten percent of the total calculated space for unexpected needs such as extra aisles, vendor equipment, or last‑minute adjustments. This buffer helps ensure that the event flows smoothly without overcrowding any particular zone.
Yard Preparation
Preparing the outdoor space before the arrival of tents, furniture, and décor is essential for a safe and attractive setup. Begin by clearing the area of debris, toys, garden tools, and any loose items that could become tripping hazards or interfere with anchoring systems.
Next, inspect the ground surface. If the event will be on grass, mow it to a uniform height of about two inches and remove any clumps or thick patches that could cause uneven tent flooring. For dirt or soil surfaces, consider lightly raking to level high spots and fill low spots with sand or gravel to create a stable base. On concrete or paved areas, sweep away dust and check for cracks that could affect stake placement.
Mark the boundaries of the intended tent footprint using spray chalk or biodegradable flags. This visual guide helps the installation team position the structure accurately and ensures that you maintain required setbacks from property lines, fences, or utility lines as dictated by local regulations.
If you plan to install sidewalls, verify that the ground along the perimeter is firm enough to hold the stakes or weights. Soft soil may require longer stakes or additional ballast such as sandbags. For hard surfaces, use weighted plates or concrete blocks designed for tent anchoring.
Consider drainage as well. Although the event is short‑term, heavy rain could pool in low‑lying areas. If you notice any depressions that collect water, fill them with gravel or create a shallow swale to direct water away from the tent and guest zones.
Finally, ensure that there is clear access for delivery trucks. Measure the width of your driveway or gate and confirm that it can accommodate the vehicle transporting the tents, tables, chairs, and other equipment. Remove any low‑hanging branches or obstacles that could impede the truck’s path.
Load‑In Timeline
A well‑organized load‑in schedule minimizes stress and helps the event start on time. Begin the day before the event by confirming the delivery window with the rental provider. Provide them with the exact address, including any access codes or gate instructions, so the driver can arrive without delays.
On the day of the event, aim to have the delivery crew arrive at least three hours before the scheduled start time. This window allows for offloading, positioning the tent, anchoring, and installing sidewalls if needed. Use the first thirty minutes to verify that all components have arrived and are in good condition.
During the next hour, focus on erecting the tent frame. Follow the manufacturer’s instructions for connecting poles, securing the canopy, and tightening all bolts. Once the frame is up, drape the canopy over it and secure the edges with stakes or weights. Check that the canopy is taut and that there are no loose flaps that could catch wind.
After the tent is stable, allocate time for installing flooring if you are using a separate dance floor or protective ground cover. Interlocking panels should be laid snugly together, with seams taped if necessary to prevent shifting.
Proceed with placing tables and chairs according to the layout plan you created during the guest‑count math step. Start with the perimeter tables and work inward, ensuring that aisles remain at least three feet wide for easy movement. If you are using chair covers or sashes, add them now.
Next, set up any additional features such as buffet tables, gift tables, or a lounge area. Position these items away from high‑traffic zones to avoid bottlenecks. If you have a sound system, place speakers at ear level and aim them toward the central guest area, keeping cords taped down to prevent tripping.
Finally, conduct a quick walkthrough with the event host or planner. Verify that all items are secure, that the tent is properly anchored, and that there are no safety hazards. Address any last‑minute adjustments before guests begin to arrive.
Rain Plan
Even with a clear forecast, outdoor events benefit from a contingency plan for precipitation. The primary protective layer is the tent itself, which shields guests from rain when sidewalls are installed. Ensure that sidewalls are available and that the installation team knows how to attach them quickly if weather changes.
Monitor the forecast in the hours leading up to the event using a reliable weather service. If there is a significant chance of rain, consider pre‑rigging the sidewalls so they can be deployed in minutes rather than waiting for the crew to fetch them.
In addition to sidewalls, think about ground protection. Lay down interlocking plastic or rubber flooring beneath high‑traffic zones such as the entrance, buffet line, and dance floor. This prevents mud from being tracked inside the tent and keeps the surface safe for walking.
If the rain becomes heavy enough to pose a risk of water pooling on the tent canopy, verify that the tent fabric is rated for water resistance and that the seams are sealed. Most commercial tents are designed to handle moderate rainfall, but extreme downpours may require additional measures.
Have a plan for relocating certain activities if the rain intensifies. For example, move a buffet table closer to a sidewall opening where guests can serve themselves without stepping outside. If a dance floor is essential, consider using a water‑resistant surface or postponing dancing until conditions improve.
Communicate the rain plan to any vendors, such as caterers or entertainers, so they know where to set up equipment and how to protect their goods. Provide them with clear instructions on where to place covers for food items or electrical gear.
After the event, inspect the tent and all equipment for moisture. Allow the canopy to air dry completely before packing it away to prevent mildew. Wipe down tables, chairs, and any electronics with a dry cloth.
Local Logistics
Hosting an event in Sandy Springs involves coordinating with several municipal services and community resources. Start by checking whether you need a temporary use permit for placing a tent or other structures in your front yard or driveway. The city’s planning department can provide guidance on setback requirements, height limits, and any noise ordinances that may apply after a certain hour.
If you intend to use amplified sound, verify the permissible decibel levels and the latest time you can operate speakers. Some residential areas have quiet hours that begin as early as ten p.m., so plan your program accordingly.
Traffic flow is another important consideration. Inform your neighbors about the expected arrival and departure times of delivery trucks and guest vehicles. Providing a courtesy notice can help prevent misunderstandings and maintain good community relations.
Parking for guests should be arranged in advance. If your driveway cannot accommodate all vehicles, identify nearby streets where legal parking is allowed. Avoid blocking fire hydrants, driveways, or intersections. You may also consider hiring a valet service or using a nearby lot with shuttle service if the guest count is large.
Utilities such as electricity and water access may be needed for catering equipment, blenders for drinks, or cleaning stations. Locate the nearest outdoor outlet and confirm that it is grounded and capable of handling the load. If you need additional power, a generator rated for outdoor use can be positioned a safe distance from the tent, with proper ventilation and noise mitigation.
For events that involve food preparation on site, ensure that you comply with the local health department’s guidelines for temporary food service. This may include having a hand‑washing station, maintaining proper food temperatures, and disposing of waste in designated containers.
Finally, keep a copy of your rental agreement, permit (if required), and insurance documentation readily available on the day of the event. Having these documents on hand facilitates smooth interactions with any officials who may stop by for a routine check.
Checklist
Use this comprehensive list to verify that every critical element has been addressed before guests arrive. Mark each item as completed to ensure nothing is overlooked.
- Confirm event date, start time, and estimated guest count.
- Verify exact street address, city, state, and ZIP code for delivery.
- Measure usable yard space and subtract permanent obstacles.
- Select appropriate tent size based on guest‑count math and layout preferences.
- Arrange for delivery of tents, sidewalls, flooring, tables, chairs, linens, and any specialty items.
- Clear the work area of debris, toys, and garden equipment.
- Mow grass to uniform height or level dirt/sand surfaces as needed.
- Mark tent footprint with chalk or flags and confirm setbacks from property lines.
- Check ground firmness for staking or determine need for weights/sandbags.
- Ensure driveway or gate width accommodates delivery vehicle.
- Plan for drainage adjustments if low spots are present.
- Confirm delivery window and provide access instructions to the rental team.
- Schedule load‑in to begin at least three hours before event start.
- Verify tent frame assembly, canopy tension, and sidewall attachment procedure.
- Lay interlocking flooring for dance floor or protective coverage if used.
- Place tables and chairs according to layout, maintaining minimum aisle widths.
- Add chair covers, sashes, or cushions as desired.
- Set up buffet, gift, lounge, and any specialty tables away from high‑traffic flow.
- Position sound equipment, secure cords, and test volume levels.
- Arrange for power access: locate outlets, verify capacity, or schedule generator.
- Confirm water source for catering cleaning stations or drink preparation.
- Review local permit requirements for tents, sound, and temporary structures.
- Check noise ordinance times and adjust program schedule if needed.
- Notify neighbors about expected truck and guest traffic.
- Designate legal parking areas for guests and communicate directions.
- Arrange for valet or shuttle service if parking is limited.
- Ensure compliance with health department guidelines for any on‑site food prep.
- Place hand‑washing station if required by health regulations.
- Set up waste and recycling bins in convenient locations.
- Prepare rain plan: have sidewalls ready, ground protection, and vendor notices.
- Conduct final walkthrough with host or planner to confirm safety and readiness.
- After event, inspect equipment for moisture, allow tent to air dry, and pack.
- Store rental documents, permits, and insurance papers for future reference.
Frequently asked questions
exactly 6 lines each "Question
Answer". Must ensure meta description under 155 characters.